
How to create a Round Robin Calendar
The Round Robin Event Type offers a powerful solution for streamlining appointment scheduling, particularly beneficial for teams with multiple members. This approach functions by:
Automated Assignment: When a new meeting request arrives, the Round Robin system automatically distributes it to the next available team member following a predefined order. This eliminates the need for manual scheduling, saving significant time and reducing the back-and-forth communication often required to find a suitable time slot.
Balanced Workload Distribution: The round robin approach ensures a fair distribution of meetings across the team. Each member receives an equal share of appointments, preventing situations where some are overloaded while others have limited interaction with clients.
Manual Appointment Assignment: This allows you to configure which team member should be assigned to appointments in a round-robin calendar, providing options for reschedule preferences and new appointment preferences. Users can choose whether to assign a team member through round-robin scheduling or select a specific team member for both rescheduled and new appointments.
Setting up a Round Robin event:
Step 1: Navigate to the Calendar Tab
Open the Calendar tab in your account
Select “Calendar setting” on top right corner and click on “Create Calendar”

To create a Round Robin event, click on the Create Calendar icon

After selecting Round Robin, a new note pop-up will appear. Fill in the following details:
Calendar Name: Enter the name of your calendar.
Description: Add a description for your calendar.
Select Team Member: Choose the team member associated with the calendar.
Custom URL: Provide a custom URL for the calendar.
Meeting Duration: Set the duration for each meeting.
Availability: Define the availability for meetings.
After filling in the details, save the calendar and then edit the calendar to set up the additional options.
Steps to Edit Your Calendar
1. Open Your Saved Calendar
Navigate to your saved calendar and open it.
2. Edit Your Calendar
Click on the three dots to open the menu.
Select the Edit option to make changes to your calendar.

3-Configure Appointment Assignment Preferences
Navigate to Meeting Details > Team Members > Advanced Settings to choose your preferences for assigning team members to new and rescheduled appointments, either through round-robin scheduling or by selecting specific team members.


When setting up or editing your Round Robin Calendar, follow these steps to ensure all details are correctly configured:
Calendar Logo:Upload a logo to appear on the calendar. This enhances the visual branding of your calendar.
Calendar Name:Set the name of the calendar. This name will be displayed as the title at the top of the calendar.
Description:Add a description for the calendar. This provides context and information about the calendar's purpose.
Group:Select a group for the calendar if you want to add it to a specific group.
Custom URL:Add a specific name or title in this field. This customizes the calendar's URL for easier access and identification.
Meeting Invite Title:Add a title for the appointments. This title will be used for the meeting invites.
Appointment Distribution: You can assign appointments based on the following criteria:
Optimize for Availability:
Choosing "optimize for availability" will assign the appointment based on priority. If one team member has a higher priority, the appointment will be assigned to them instead of someone with a lower priority. If multiple team members have the same priority, the meeting will be assigned to the person who hasn't had a scheduled meeting for the longest time.

Optimize for Equal Distribution:
Choosing "optimize for equal distribution" means spreading out meetings evenly among the team. It monitors the number of meetings each person has. If one team member has significantly more meetings than the others in the last 24 hours, they won't be assigned any more until their teammates catch up.
Select Team Members: Choose the team members you want to assign to the calendar. This allows for efficient distribution of appointments among team members.

Configuring Availability:
Date Specific Hours: Adjust your schedule for specific dates. Override your regular weekly hours
Duration & Interval: Set the time frame for meetings and the frequency of their occurrence.
Buffer Time: Allow a cool-down period between appointments.
Pre Buffer: Additional Time added before an appointment.
Post Buffer: Additional Time added after an appointment.
Max Bookings: Define daily appointment limits.
Scheduling Protocols: Dictate prior notice and lead time requirements.
Office Hours: Define your general availability or specify it for unique dates.
Recurring Appointments: Choose the rhythm of repeated sessions.

Forms, Payments, and Guest Inclusions:
Use a default or curated form for the booking widget.

Pre-Populate Fields: Enable the system to recall previous attendees with the Pre-populate fields(sticky contacts) toggle to remember your contact information.

Consent Checkbox: Toggle this option to allow obtaining consent from contacts when they provide their phone number during the appointment booking process.

Add Guests: Allow main participants to bring in additional guests, streamlining group schedules

Name and mailing address: Include the data of the guest to be able to attend.
Note: In many cases, attendees are required to fill in the information before the appointment so that service providers can use that information for the appointment. An example can be a Medical Appointment: This could be allergies, any genetic ailments, past medical issues, etc.
Count Option for Adding Guests: This is particularly useful in cases where the primary attendee may not have the email addresses of the guests, but still wants them added to the appointment.
Pixel ID Tracking: Seamlessly incorporate scheduling into your analytic journey.
Auto-confirm New Meetings: Activate this feature to instantly confirm new appointments on available calendar slots, ensuring users receive immediate booking confirmations.
Billing Integration: If charging, integrate with reliable payment gateways like Stripe and turn on the accept payments feature, fill out the price and description.

Accept Partial Payment: Enable partial payments by toggling the "Accept Partial Payment" option if you want to charge the clients partially. Specify the deposit amount or percentage required during the appointment booking process.

Stripe Payment Gateway: Seamlessly bill for appointments by integrating with Stripe. Key configurations include setting the amount, deciding the currency, selecting between Test/Live environments, and customizing charge descriptions.
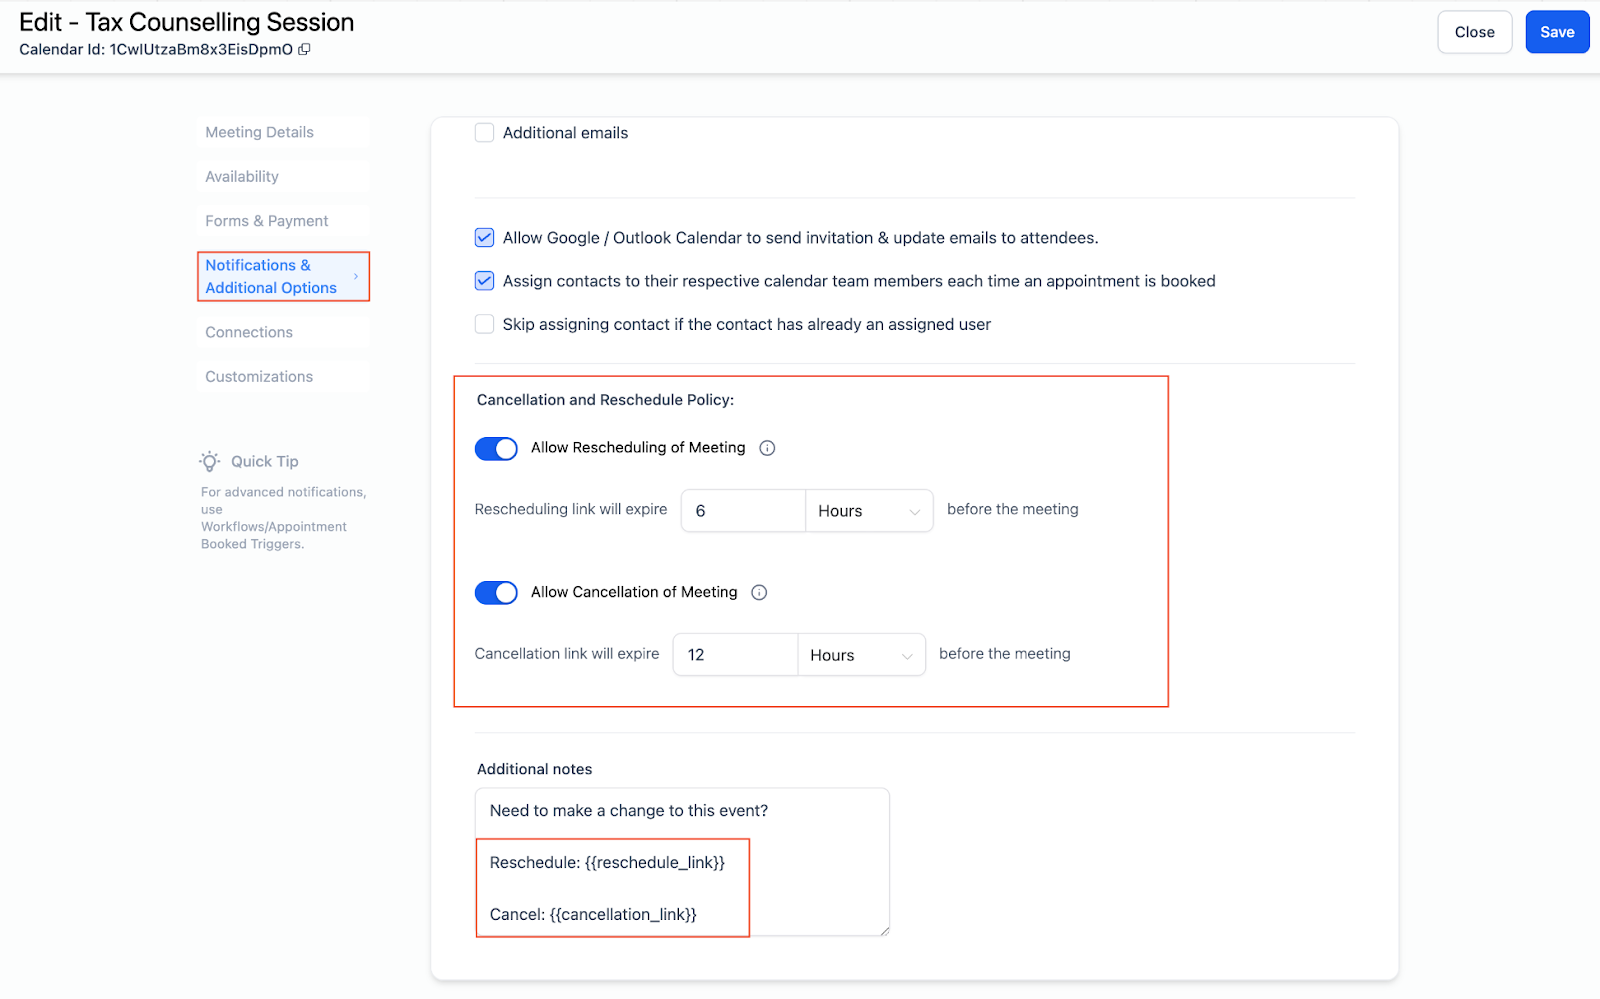
Notifications & Additional Options:
Notification Types:
Determine your desired acknowledgment, be it a simple appointment confirmation or an update.
Decide who gets notified: the contact, an assigned user (especially for round-robin calendars), or specific emails.
Google Calendar Integration
Permit Google Calendar to send appointment invitations or update emails to attendees.
Assign contacts to their respective calendar team members upon appointment booking.
Booking Features:
Set specific time frames after which the cancellation or reschedule links are disabled, requiring bookers to contact the business directly for any changes.
Specify the time range after which the links should be disabled. (Note: Leaving this value blank means the link will never expire and bookers can access it anytime.)
Customization
Calendar Cover Image:
You can upload a cover photo. The uploaded image will be visible within the Group View for the Neo template but won't appear on the individual calendar link.
Widget Customization & Appearance:
Style Selection: Opt between the contemporary Neo or the classic design for your widget.
Primary Color: Select the color for buttons, dates, time slots, and actions.
Background Color: Set the background color for the date and time slots and the form.
Button Text: Add the text that you want to display on the scheduling button.
Calendar Title: Toggle on the calendar title to display the name of the calendar.
Calendar Description: Toggle on the calendar description to display the description of the calendar.
Calendar Details: Includes information such as duration, date & time, recurring details, and timezone.
Custom Code: You can insert the custom CSS code to customize the calendar in your desired way.
Staff Selection: Allow staff selection during bookings, letting contacts choose which user or staff member to schedule with.